
Introduction
In conjunction with a public referendum I was given the task to create an intelligent chat bot. The chat bot could understand what the user wanted to know and provide the answers that our subject matter experts had prepared. This post describes the first step of setting up such a chat bot.
Overview
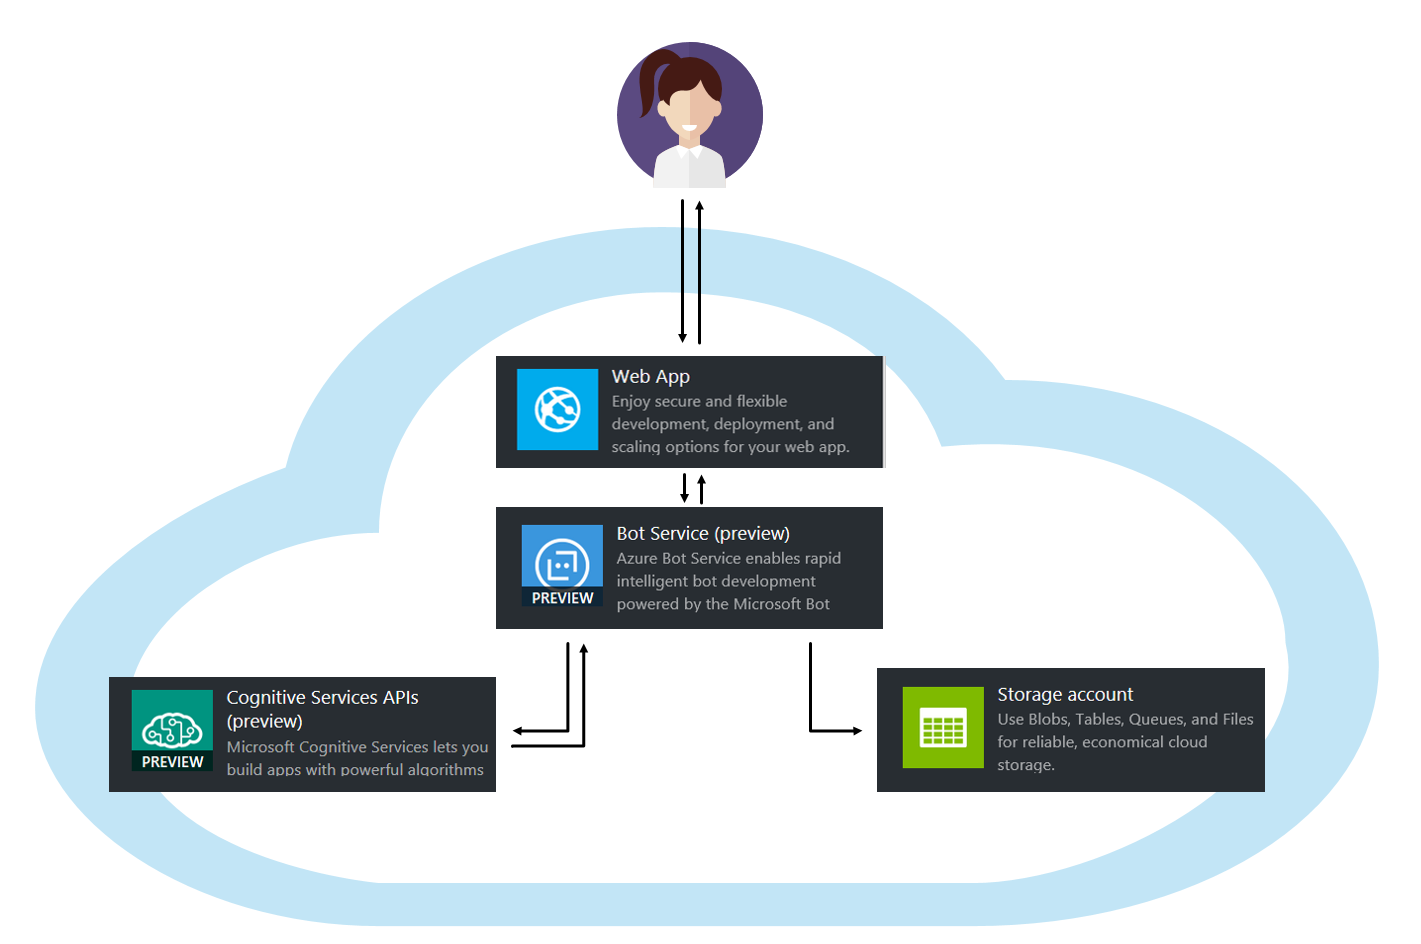
The chat bot was built from a number of different components. While there are many options available online, I decided to do it all using Microsoft tools, and host all components on the Microsoft Azure cloud.
- The bot is centered on the Bot Service, which is using Microsoft Bot Framework (https://dev.botframework.com/).
- The user communicates with the bot through a web interface, which I decided to host on Azure as Web App, but could really be a corporate website or another chat connector such as Skype, Slack or Facebook Messenger.
- To understand what the user is saying messages are being sent from the Bot Service to LUIS, which is part of Microsoft’s Cognitive Services APIs. LUIS replies to the bot with recognized “Intents” and “Entities”.
- Information that we decide to store for further use is stored on a rather simple Azure Table and can be queried from another program.
Natural Language Processing
The Natural Language Processing is using the LUIS framework, Language Understanding Intelligent Service.
After signing in you will find yourself on the “My Applications” page. These applications are essentially the models that you create for making the bot understand natural language. To create a new application click the “+ New App” icon in the top left and fill in the details. Do not forget to set the language culture. I choose German language in this case.
In the main window you will find a left pane containing your Intents and Entities, and the center part of the screen is dedicated for dealing with Utterances.
- An intent is the recognition that the user want the bot to take some form of action. For example, if the user says “Help” you probably want the bot to display instructions.
- An entity is a part of the sentence that you want the bot to make use of in the conversation. It can be a name, a location, a date etc.
- An utterance is something that a user provided as input. The goal of our implementation of LUIS is to turn Utterances to Intents and Entities.
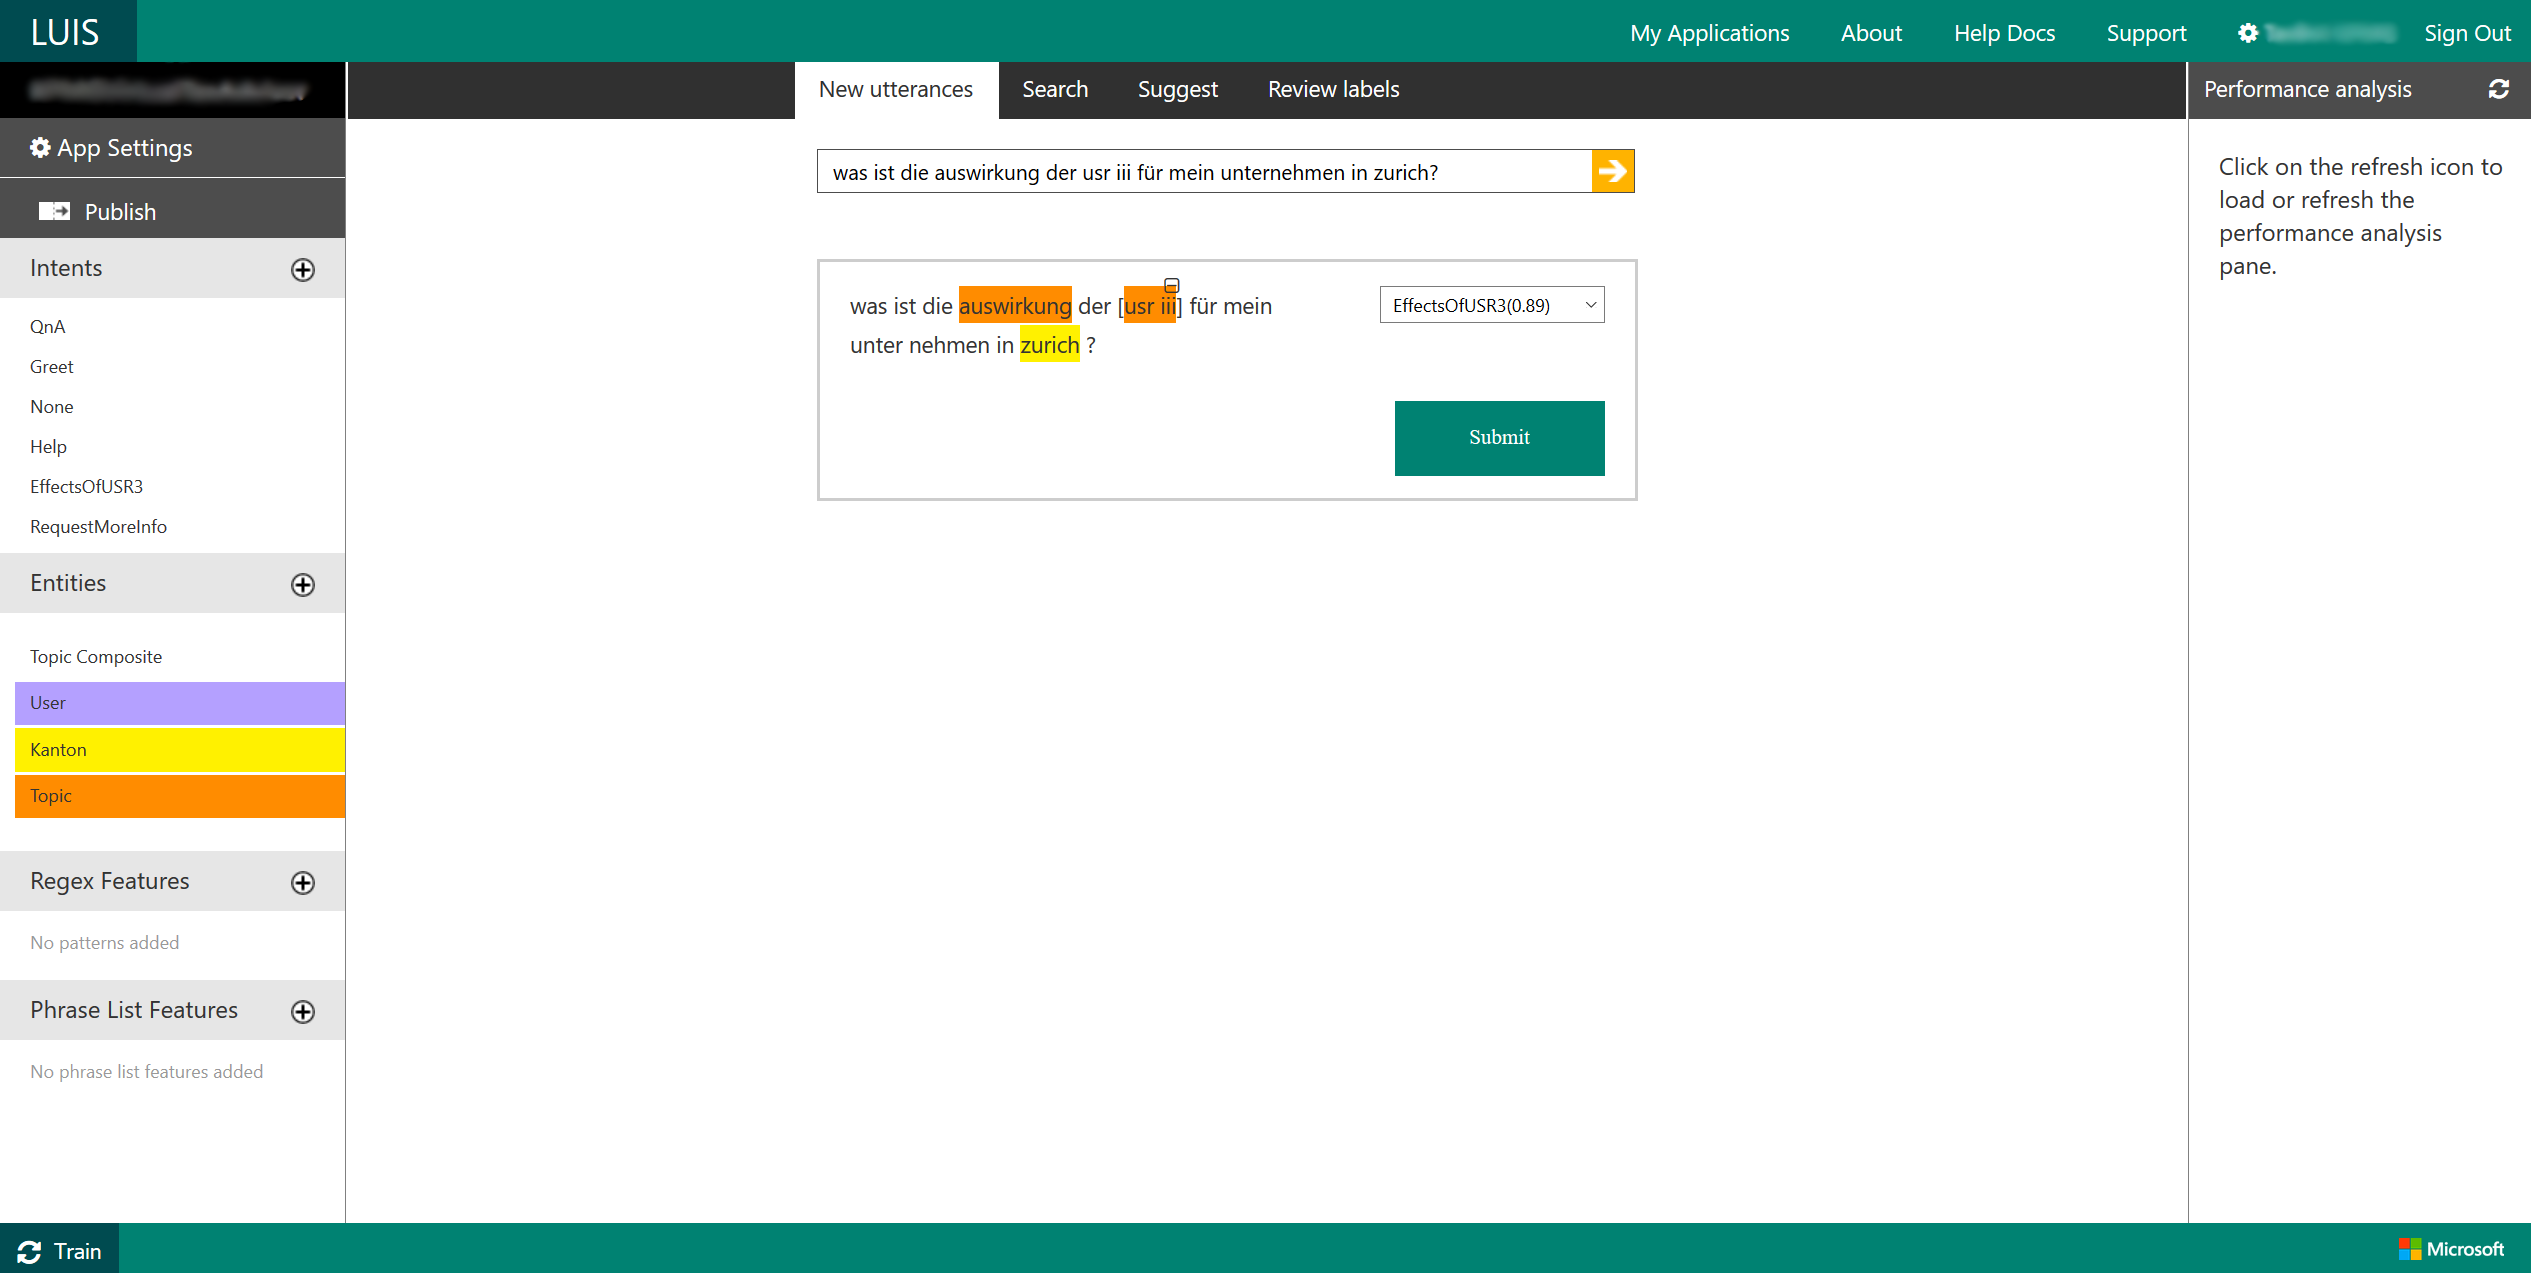
In the screenshot above the utterance is a question about what effects the new tax reform will have on my Zurich based company. The utterance is a good match to the intent “EffectsOfUSR3”, and if you think it should rather be matched to another intent you can change it in the drop-down menu.
The coloring of the text indicate recognized entities, where orange is intents of type Topic, and yellow is Kanton. The advantage of this recognition is that the bot does not need to ask questions about information that the user already provided. In this case, it would be awkward if the bot responded by asking which canton the company is located in, since the user already provided that information in the question. If you have entities that consist of multiple words it can be convenient to create composite entities to ensure that LUIS is capturing the whole string of words.
Training and publishing the model
When you are done with adding Intents and Entities and teaching LUIS how they should be used given an utterance, you should train the model. Click the recycle icon in the bottom left and wait for the training to finish. To enable the bot to make use of the newly trained model you need to publish it. Click “Publish”, directly above “Intents” and update the published application.
If you want to debug your model you might find the verbose output to be helpful. Type in the utterance you want to test and click the URL. This will provide you with the JSON response, which is also what your bot will see as a reply from LUIS.
One thing to note here is the URL contains the subscription details of the language model. You will need this information in the subsequent steps.
Last but not least the “App settings” menu item contains the subscription key to the Cognitive Services API. You can work with the free model, but I find the paid subscription to be cheap. You can buy a key directly from the blue link in this window, it will take you to the Azure portal.
Creating the bot service
With the LUIS language understanding up and running it is time to create the bot service that will talk to LUIS. We choose to stick to the Microsoft product stack, and use their Bot Framework.
You can create the bot service through the Azure Portal. Click the green plus in the top left corner and search for “Bot Service”.

After creating the bot with appropriate name, resource group etc you will be prompted for the App ID for the bot.

If you followed these instructions up to now you do not yet have an App ID, so go ahead and click the blue button to create one. This will take you to the registration portal for the bot, where you get assigned the App ID and a password. Make sure to copy password since you will never see it again!
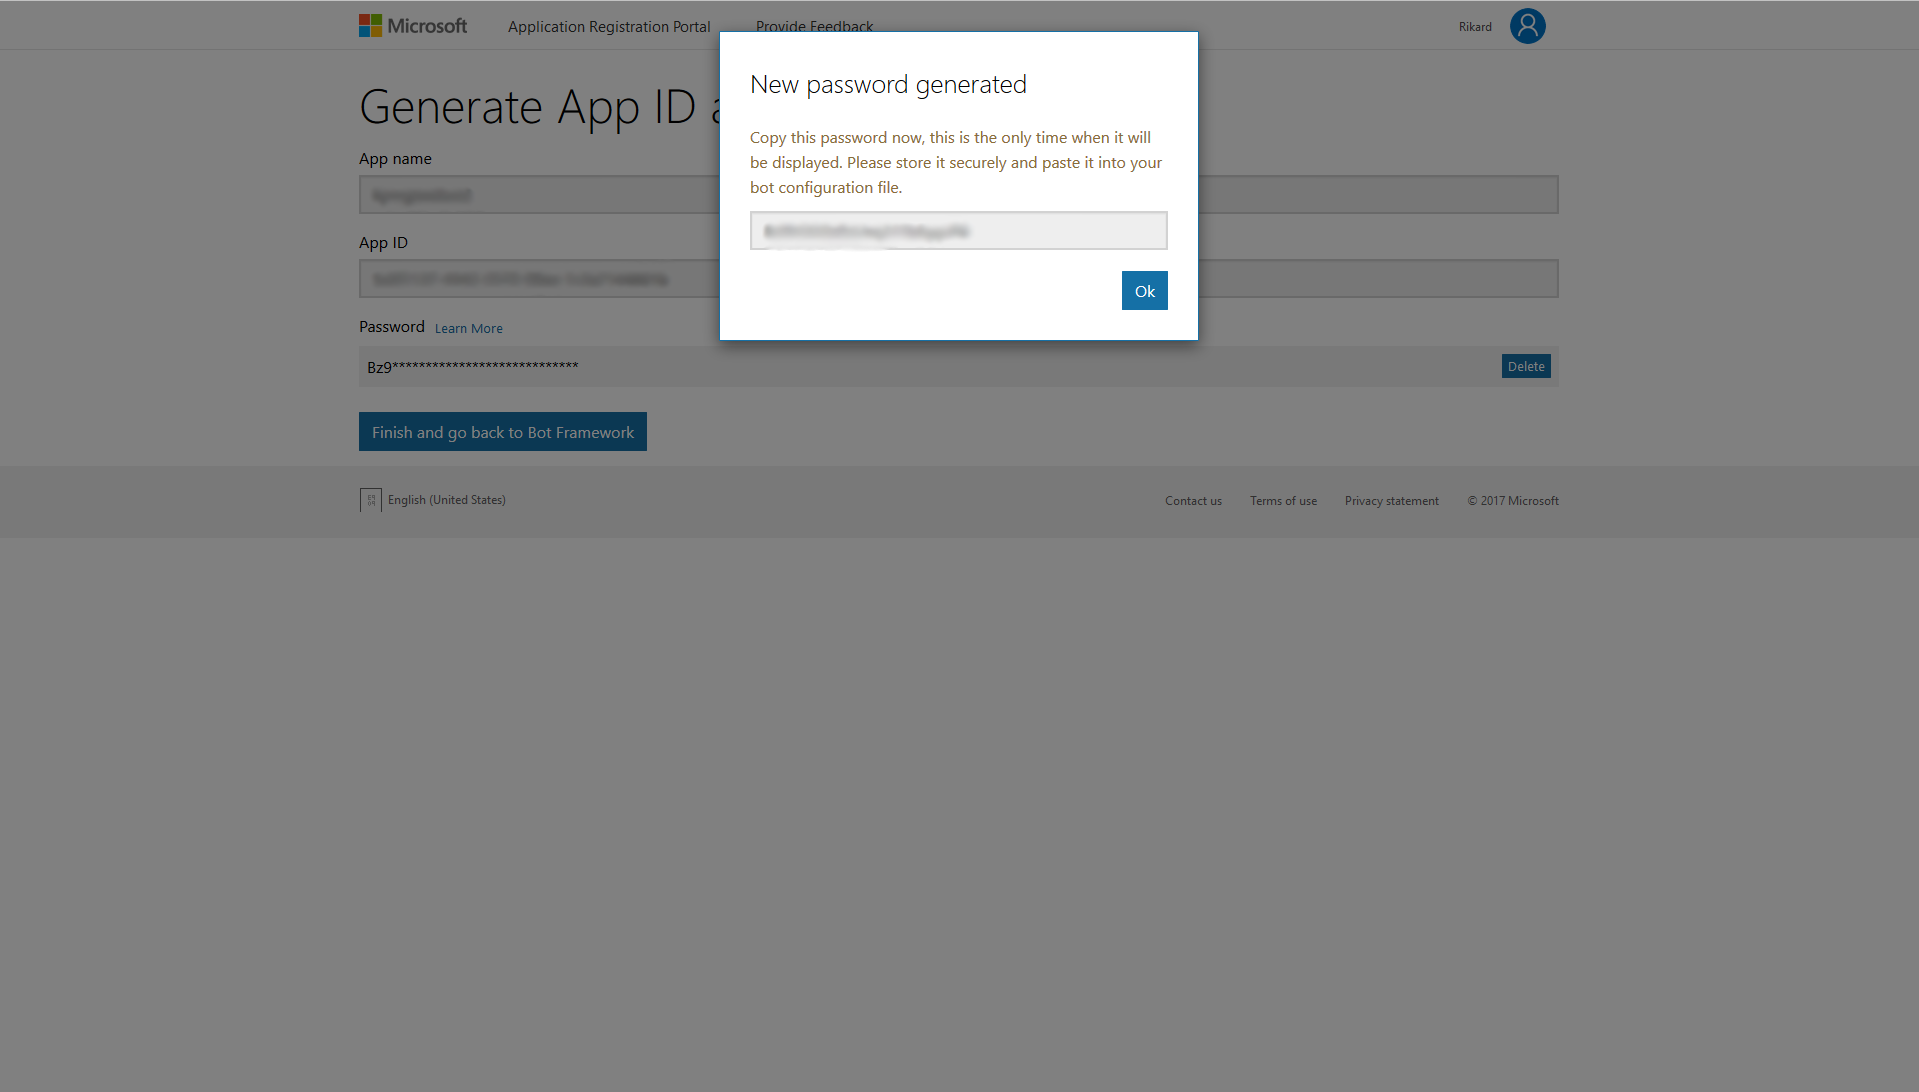
With this completed you will be taken back to the Azure portal, where you paste in the password you just copied.
Select if you want to use C# or node.js as programming language for the bot. In this case I choose to use node.js. The choice of template does not really matter, you will anyway modify that code later.
After creating the bot you need to wait a few minutes before you are taken to a page similar to the one below:
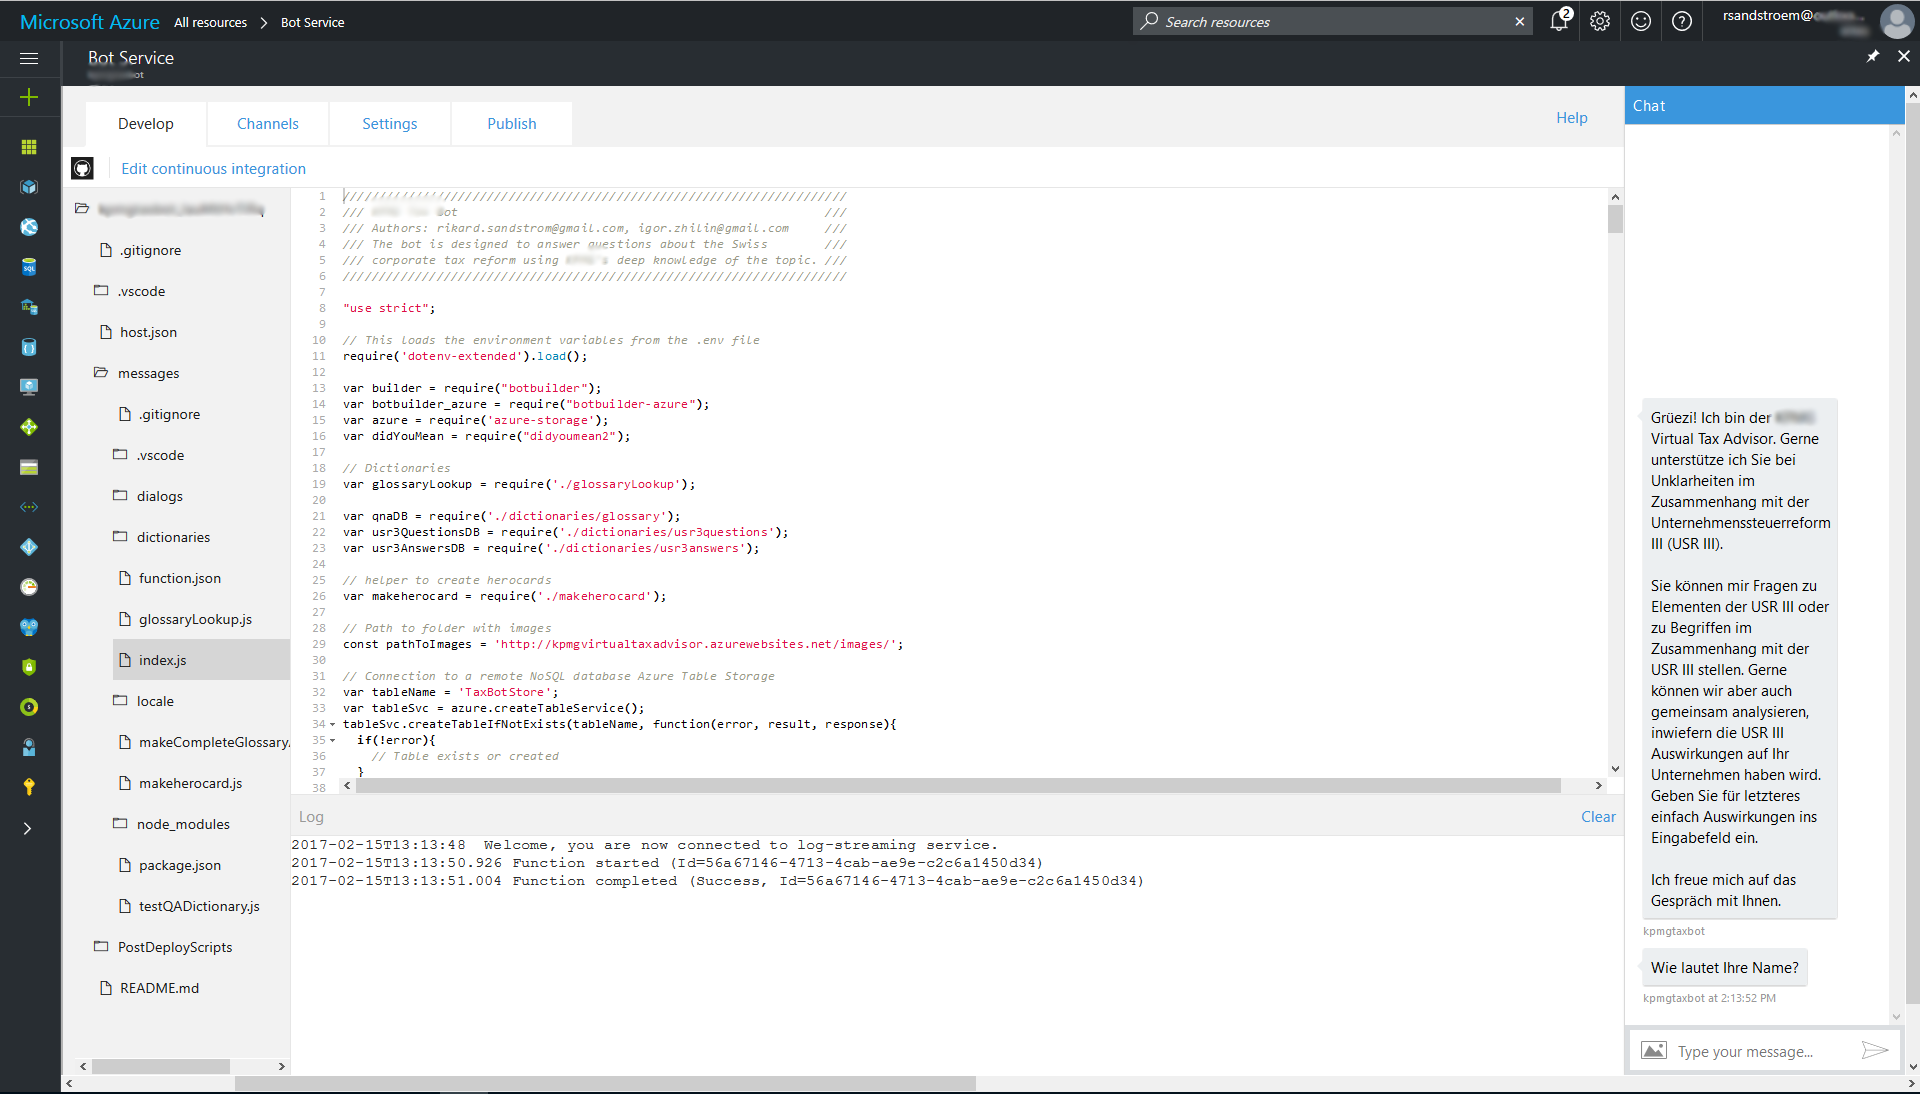
With this view you can already edit your bot (center pane) and test the bot by chatting with it using the chat window on the right.
Linking the bot service with LUIS
So far the bot and LUIS have no relation with each other. To change that click on the “Settings” tab, and open “Application settings”. Scroll down and you will find a list of key-value pairs.
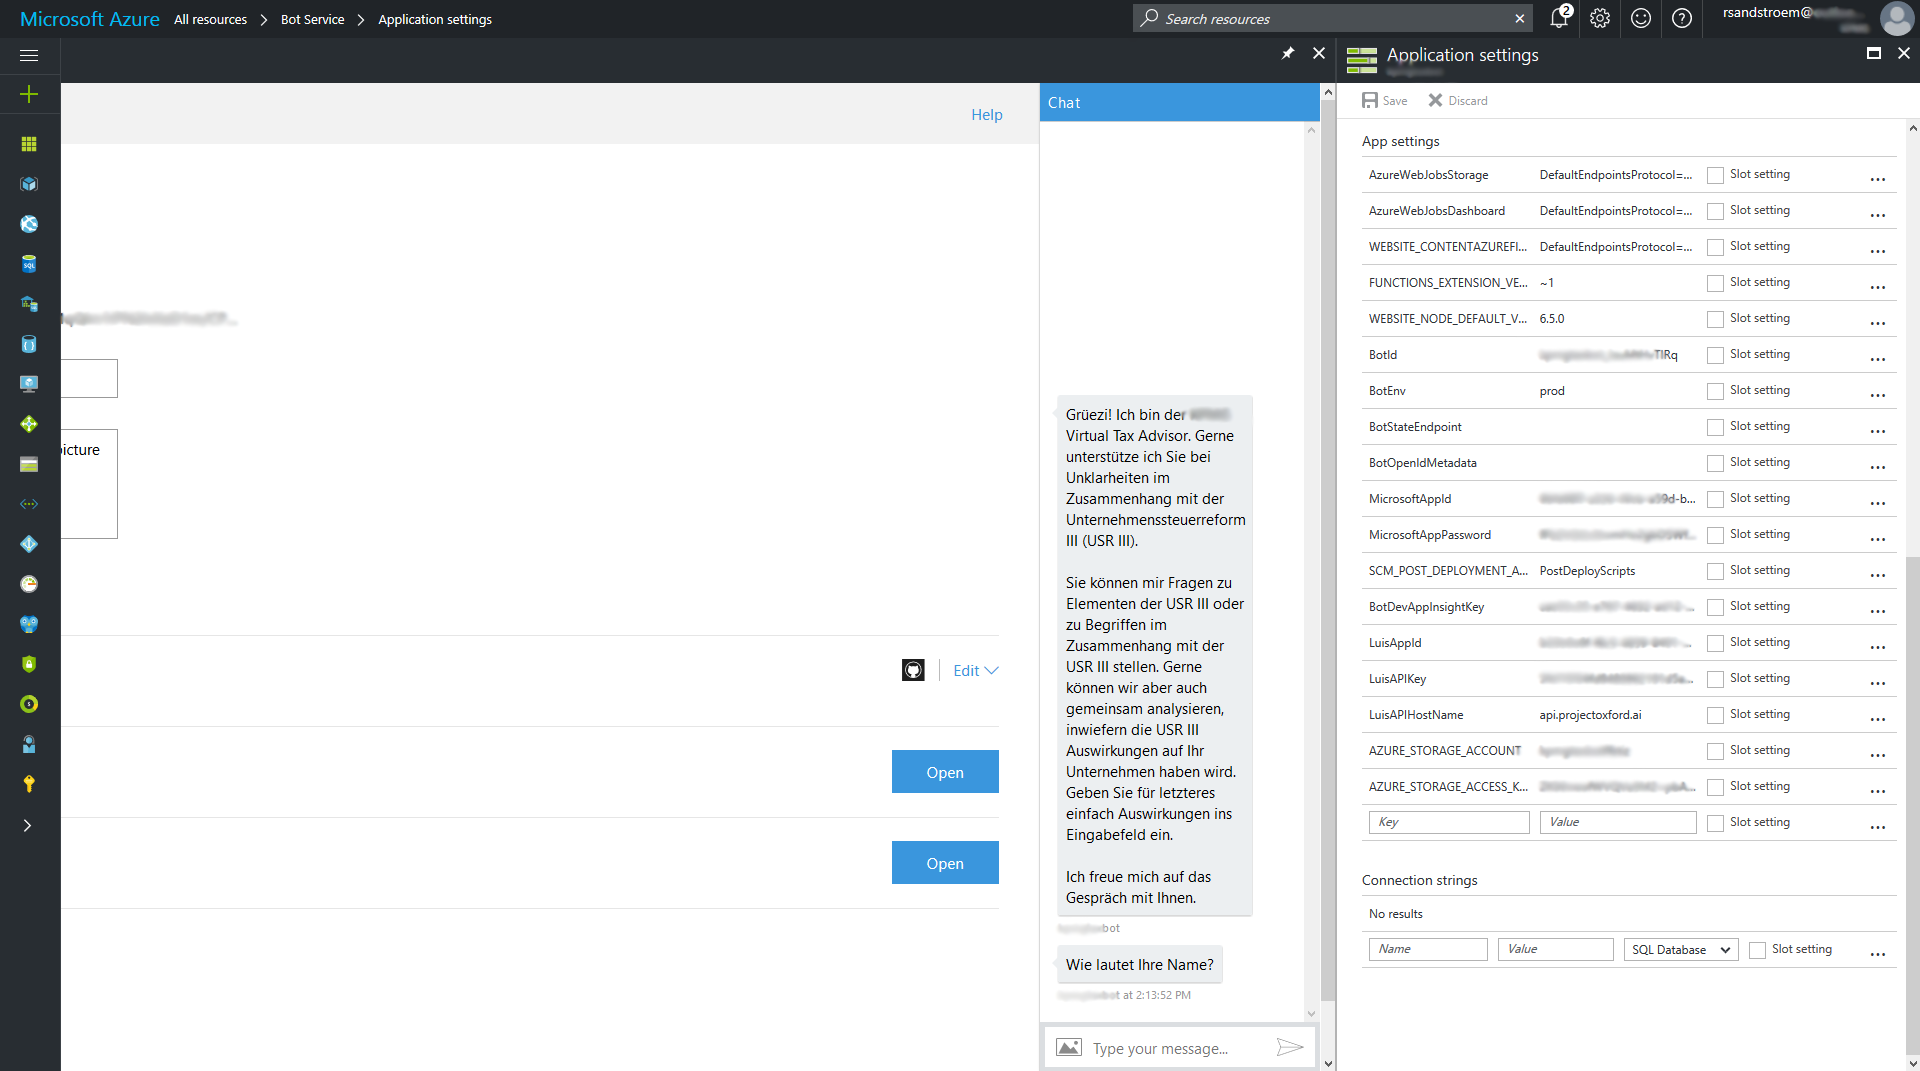
Enter the LuisAppId, LuisAPIKey and LusiAPIHostName as this example shows. The values associated to these keys can be extracted from the URL in “Publish” section of the LUIS model.
Code repository
Rather than editing the bot within the Azure portal I strongly recommend linking the bot service to a code repository. This allows version control, release management and other standard software engineering practices.
Still on the “Settings” tab, click on “Configure” next to “Continuous integration”. Follow the steps show in the portal, i.e., download the code, create a repository etc. Then click on “Set up integration source”, followed by “Setup” in the top row. Choose you repository, e.g., GitHub and provide the configuration details.
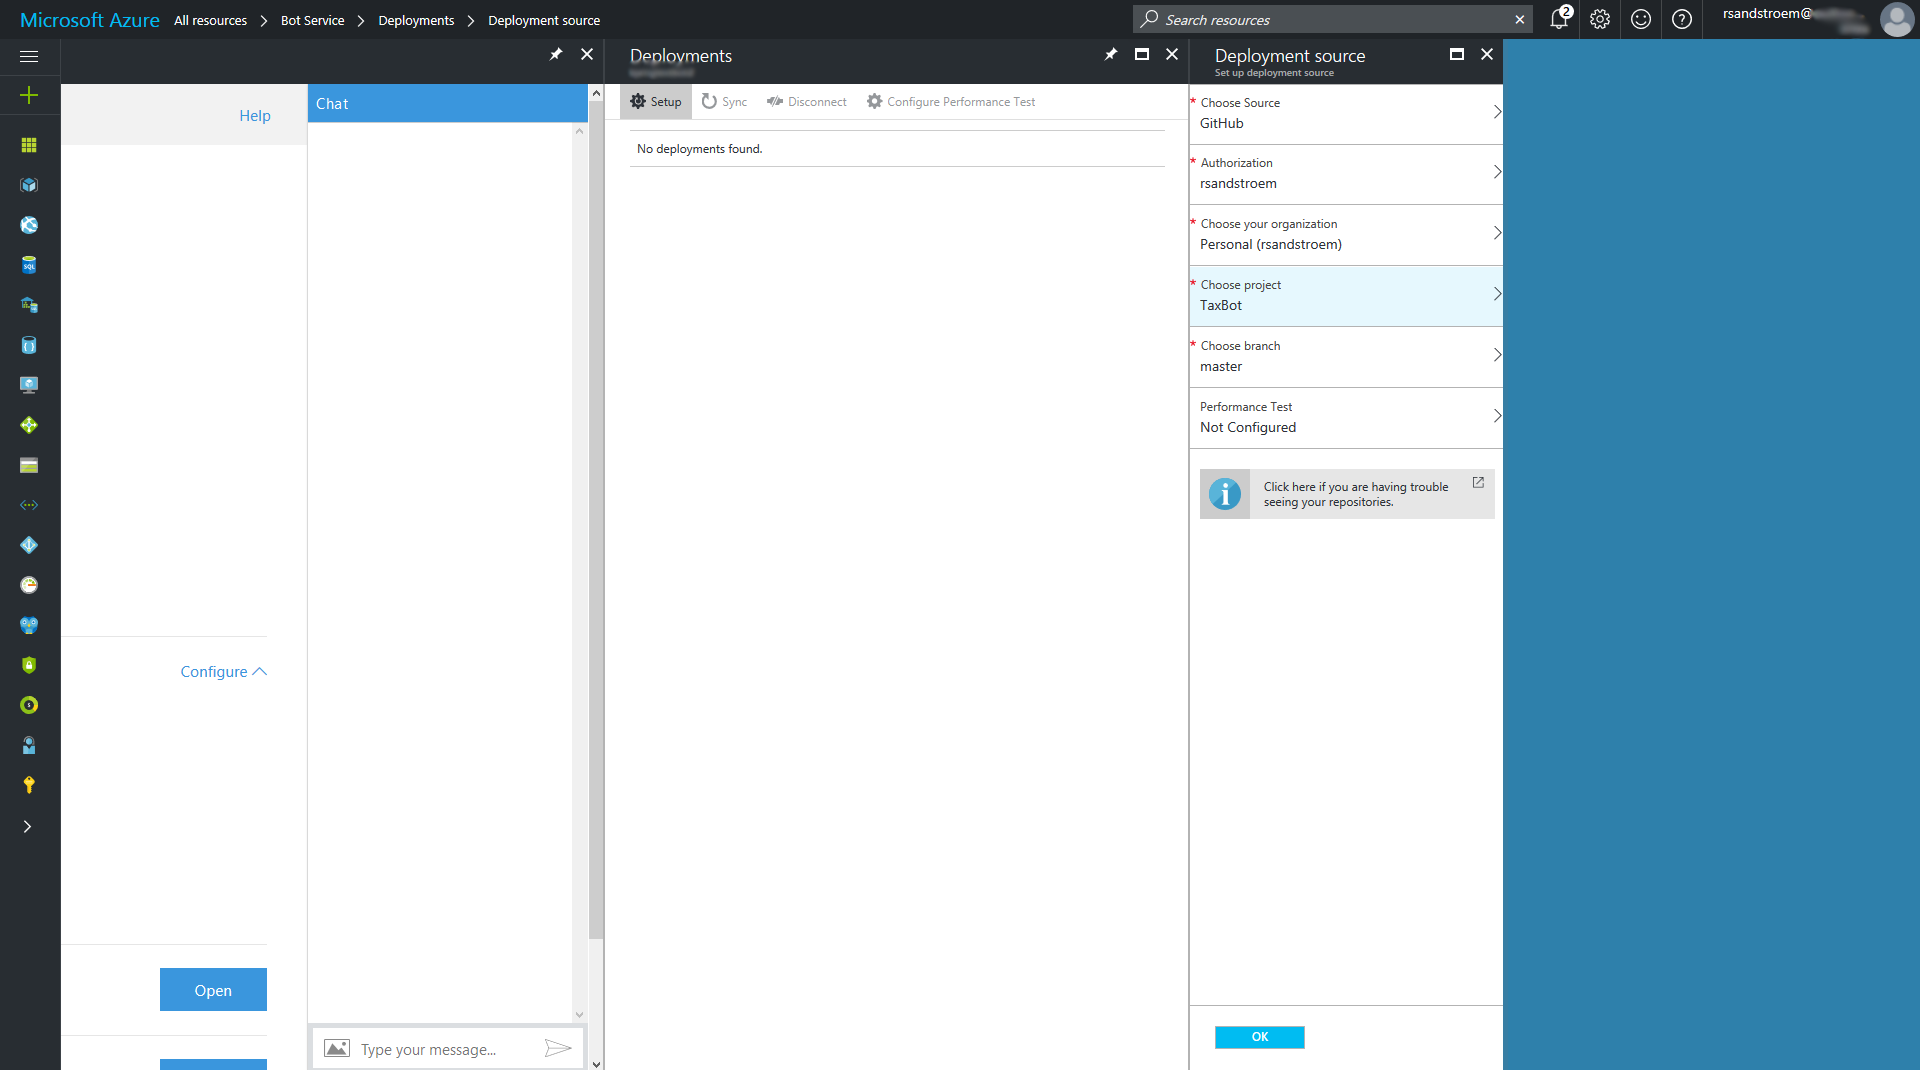
When happy click “OK”. Wait a few minutes and the portal should automatically pull in the code from the repository and redeploy the bot.
What is next
In this blog post we have seen the different components of the blog and how they work together. However, the bot is not currently doing anything. For that we need to write some code. This topic will be covered in the next blog post.
Comments !